
Boxing Clever
Hallo there!
Looking forward to the holiday
weekend? Of course you are
oooh|! Just the thought of four
days of crafting time .............
be great wouldn't it? We can
all dream.....
We have a great time ahead
with our latest topic and to
start us off here is Jane Castle:
"Today I would like to share with you
my first tinkering with these fab
and quite addictive little boxes,
or should I say cubes?
They come in three sizes,
as you will see below, which
means there are many different
combinations of displays to be
made --------or just a single
pod with a photo would make
an excellent present

For this project I used 1 large, 2 medium and 1 small.
The Cubbeys come with or without apertures
and for my 2 medium ones I have used 1 of each.
I started by giving all the cubes and
the beach hut a coat of white gesso,
then I played around with my design shape.

The boxes were then dismantled and the fun began!
I stamped a group of flowers onto a piece of
natural coloured calico using Archival ink. This was
then embroidered by hand, trimmed to size ready
for the medium cube with an aperture.

This cube was then painted in slate chalk acrylic,
stamped and heat embossed in white using
the smaller stamp from Blue Fern Studios
Ornamentals set.

I then added small touches of Treasure Pewter
to areas of the embossing.
Next onto the other medium sized cubbey,
this was painted in Toad Hall paint,
a coat of Americana Weathered Wood
and finally a coat of Nougat paint.
Then the centre panel had a small area
in the middle dabbed with some Lake Wanaka paint
before stamping the image in black.

These 2 cubbeys were then assembled
and the front edges brushed with Toad Hall.

I found that the edges needed more
than 1 coat of Toad Hall so they
were all given a second layer once
the whole display was assembled.
Now onto the small cubbey,
this was sponged using 3 different colour blue paints.

The Beach Hut was painted in Snowflake and Guacamole,
The number sign over the door was written in black.
The base of the cubbey under the hut had some Grunge paste
added in uneven clumps and when dry sponged with
some Tikka paint to resemble sand.
The fishes were stamped onto white card in black ink
and then heat embossed using platinum EP.
This was added sparingly as I didn't want all the
fish to be silver.
These were then threaded with some
sewing cotton and attached through the top.
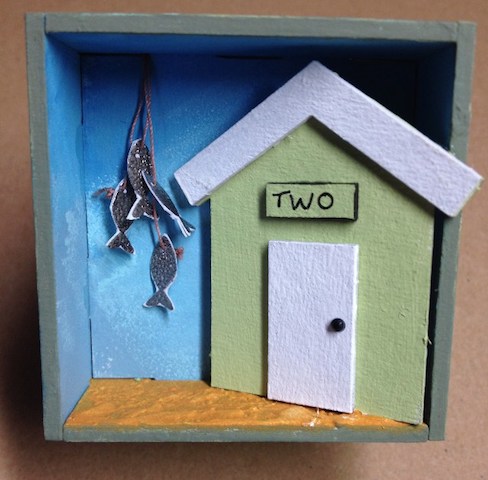
The bunting was cut from a Poppystamp die
and coloured with DI in Barn Door,
this was attached at the very end.
Now onto the final piece of the jigsaw --
the large cubbey.
Using a piece of Cut & Dry foam
the background was coloured with
Space Cadet and Stone paints

Once completely dry detail was added with
a stencil, Chartreuse and Claret paint.
The words and flowers were stamped in black
using the PaperArtsy set ZA08.
(my favourite stamp set at the moment!)
Then using some card that had been coloured
with PanPastels stamped several flowers
and cut them out.
2 were then stuck onto the background.

The flower stems were drawn in by hand
and 3 holes were made in the base so as to stick
the pieces of very thin wood for the flowers at the front.

All the outside sides of the cubbeys were
then sponged with Mermaid, Guacamole
and Space Cadet paints, left to dry and then using
the same stamp by Blue Fern Studios stamped
the image around to give the impression of a continous pattern.
This sounds difficult but it was relatively easy
as it does not need to be perfect.
This was heat embossed with clear powder and
areas touched with Treasure Pewter.

I have really enjoyed trying out the Cubbeys,
the possiblities are endless once you begin
--- perhaps order more than one set!
Have fun with yours"
Item List
Large set Tando Creative Cubbeys
PaperArtsy Fresco Chalk Acrylic Paints
PanPastels
Small piece of Calico cotton material
Wooden stick 2mm x 2mm thick
Thank you Jane - you've really got me
thinking here - just have to decide on
the combination and I'll be away!
I heard that! Who said "with the
faeries" ?😀
'Till tomorrow
Mickie xx
Brilliant, so love these boxes and the way you used them Jane. Happy crafty week, Angela xXx
ReplyDeleteMany thanks Angela, they are great fun and there are so many different ways to fill or use them! Have a great weekend X
ReplyDelete